The HP EliteDesk 800 G3 Mini is a compact and versatile machine, making it an excellent choice for home lab experimentation or general use.
To begin the storage upgrade process, locate the switch lock and plate at the rear of the device. Slide the top cover forward about an inch and lift it upward to reveal the internal components.
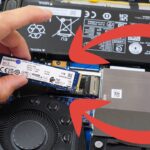
Inside, you will find a metal chassis designed for a 2.5 inch SSD or hard drive. To access the secondary storage slot, remove the three screws securing this 2.5 inch enclosure. Note that one screw may be hidden beneath a protective flap or the drive itself. Lifting this 2.5 inch chassy reveals an M.2 SSD slot underneath, allowing the device to support two separate storage units simultaneously.
When installing an M.2 SSD, insert the drive into the slot at a 30-degree angle. It is crucial to check the physical dimensions of your drive against the available mounting points. This model features two standoff positions to accommodate different sizes: the 2242 format (22mm wide by 42mm long)SSD and the more common 2280 format (22mm wide by 80mm long) SSD. Ensure the standoff is in the correct position for your specific drive before securing it with the screw.
Despite being an older model, the 800 G3 Mini remains a cost-effective entry point for hobbyists. I found my unit on the used eBay market for approximately for $180 CAD (about $140 USD), providing a budget-friendly way to test home lab setups before committing to more expensive hardware (article coming soon).
The HP EliteDesk 800 G3 Mini is a powerhouse for dual-storage configurations, making it an ideal candidate for specialized software like TrueNAS operating system. By utilizing the M.2 slot for the primary operating system and the 2.5-inch bay for a high-capacity hard drive, you can easily transform this compact unit into a dedicated Plex media server or a versatile home lab machine. Its low power consumption and affordable price point make it a sustainable choice for long-term experimentation.
Reassembling the unit is straightforward, though aligning the top cover can be slightly more tactile than removing it. Once the drive is secured with its mounting screw and the internal 2.5 inch chassis is placed back with the 3 screws, slide the computer cover back into place until you hear a satisfying click. This sound indicates the rear lock has engaged.
When you are ready to install your operating system via USB, port selection is key. To avoid compatibility issues with faster “SuperSpeed” ports (USB ports on the front and back indicated with “SS”), which can sometimes cause installation errors in systems like TrueNAS, it is best to use the designated keyboard USB port at the rear. These ports operate at a more stable speed for BIOS-level tasks, ensuring the installer reads the data correctly. Once the OS is loaded, this “dirt cheap” computer is ready to serve as a reliable, energy-efficient tinkering station for years to come.