Welcome. In this article, I‘m going to show you how to install Windows 11 on a system that technically doesn’t meet the hardware requirements.
Windows 11 Install Issue
I ran Microsoft’s PC Health Check app on my 10 year old gaming desktop, and it says my PC isn’t eligible. Yet, I’m running Windows 11 on that computer at the same time just fine.
So why does this matter? Windows 10 reaches end-of-life on October 14, 2025. That doesn’t mean your computer will stop working. In another article here, I explain what “end of life” means and how to meet Windows 11 requirements.
Plenty of people want to upgrade but are working with older PCs—like mine. I built that one 10 years ago for $3,000, and it’s still excellent for everyday tasks, indie games, and 4K video editing. The problem is TPM 2.0. Many motherboards and CPUs don’t support it.
Linux is a solid alternative—I dual boot it alongside Windows 11. But even if you have TPM 2.0, outdated processors won’t be recognized. Microsoft officially requires 8th-gen Intel or newer. I’ve got a 4th-gen i7, and Windows 11 runs perfectly anyway.
Preparing Before Install
Before jumping in, let’s prep:
- Back up all data. This process wipes your system clean.
- Don’t opt for an in-place upgrade. It’s not recommended for this method.
- We’re bypassing Microsoft’s compatibility checks—not hacking, and you don’t need technical expertise. It’s very straightforward.
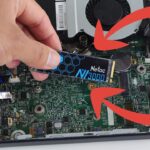
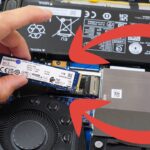
Be cautious if you have multiple drives connected. Windows may label them unpredictably. During the Windows 11 installation Disk 0 isn’t always your OS drive—it depends on how the machine is built. You could accidentally delete your storage drive thinking it’s the system drive.
To prevent that, I opened my case and physically disconnected the extra drives. Once Windows was installed, I plugged them back in. No data lost.
Quick heads-up: don’t buy a Windows 11 license key right away after reading this. It may not work on your machine, and license keys are usually non-refundable. Test first, buy later.
Start by installing Windows 11 without a license—there’s an option that says “I don’t have a product key.” Use that, confirm everything works, then pay for a key if needed.
Files To Download
You’ll also need a USB stick to hold the Windows 11 installation files.
Before diving in, check if your computer is even compatible. You might not need this artcile’s method at all. I recommend using “Startpage”—privacy-focused search engine, powered by Google. Search for “PC Health Check.” The Microsoft link should be near the top. Download and run the tool. It’ll tell you whether your system meets the Windows 11 requirements.
If you’re already compatible, Windows 10 may prompt you to upgrade. If not—and you’re working with an older setup like I am—stick with me.
Next, let’s get Windows 11 itself from Microsoft’s website. On this page, scroll past the quick-install options and find the disk ISO image. The automated USB installer isn’t what we need—it bypasses everything we’re trying to do. Download the ISO to your PC and keep it handy.
Then get Rufus software from here. It’s key for preparing your USB stick. If you’re skeptical, that’s smart—always vet software. Rufus is widely recommended, especially on forums like Reddit. It’s reliable and safe. It’s the core tool for creating bootable drives for both Windows and Linux. It’s actually the most important tool as it will bypass the Windows 11 TPM and processor requirements.
Once you’ve got the Windows ISO and Rufus downloaded, plug in your USB and we’re ready to begin.
One important note: whatever’s on your USB stick will be erased. If it holds anything important, copy it to another drive before moving forward.
Preparing Windows 11 Installer
Open Rufus—you’ll get a prompt asking if you trust the software. Hit yes. The interface is minimal. Your USB drive appears at the top (mine’s 32GB). Skip the dropdown menu and click “Select” to browse for the Windows 11 ISO you downloaded earlier. Double-click the file to load it.
Now comes the trickiest part: figuring out your BIOS setup. This is the one technical hurdle in the process and may take a bit of trial and error.
Back to Rufus: set it up for GPT—it’s the modern format and supports large drives. Most machines support UEFI, even older ones like my 10-year-old desktop. Still, mine was running in legacy mode, which I had to switch manually a few years ago.
Accessing BIOS varies by computer:
- On my Asus board, I have to keep pressing the the Delete key during start up.
- My Lenovo laptop: F2 or F12
- Dell: often F11
If you’re not sure, check your manual or post in forums. Common BIOS keys range from F1 to F12 or Delete. When booting, tap those keys. If it doesn’t work, reboot and try again (again, worse case ask in forums).
BIOS can seem intimidating, but it’s manageable. Just take your time and don’t panic—plenty of people have been in the same spot.
The simplest approach is to leave BIOS settings untouched at first. If something needs adjusting—like switching from legacy to UEFI—take a photo of your current settings using your phone. If the install fails, just revert back using the pictures. Trial and error is key here.
BIOS layouts vary wildly across systems, but the options you want are typically under one of two menus:
- Boot: Where UEFI settings usually live.
- Security: Some manufacturers tuck UEFI or Secure Boot settings here instead.
So check both, take photos, and if anything breaks, just undo the changes.
Back in Rufus: ignore the volume label and leave file system and cluster size as default. No need to adjust those.
When you hit “Start,” Rufus detects you’re loading a Windows 11 ISO and gives you optional tweaks:
- Remove TPM 2.0 and Secure Boot checks.
- Remove 4GB RAM requirement.
- Skip Microsoft account setup—you can create a local account instead.
Even on older machines without TPM 2.0 or a supported CPU, this works. At least, that’s been my experience.
Once you confirm, Rufus installs everything onto the USB stick. When it’s done, eject the stick, plug it into the target PC, and boot from USB.
Accessing the boot menu to boot from the USB drive differs by system. For example:
- My gaming rig: tap Delete to get into BIOS, then F10 to select boot device
- Laptops and prebuilt PCs: keys vary—try F2, F12, Delete, or F11 based on your brand
Once you’re in, select the USB stick and begin installation.
Installing Windows 11
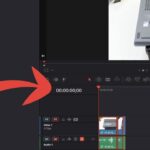
Booting up now with the USB plugged in. I tap Delete to enter BIOS and choose the USB stick as the boot device.
From here, Windows 11 starts loading normally. No hacking, no advanced tweaks—Rufus already did the heavy lifting with those bypass options. We’ll install Windows like a standard setup.
When prompted for a license key, skip it for now. First, let’s confirm your system can run Windows 11. Once it’s installed and working, you can buy and activate a key later—super simple. If installed successfully, in Windows just open the Start menu, search “About,” and plug in your license details there.
Debloating Windows 11
Some users run scripts or open PowerShell mid-install to debloat Windows 11. While they sometimes work, Microsoft eventually blocks or changes them. Even when they do work, I’ve found they can mess with functionality—especially the system clock. That causes apps to break due to sync errors.
Another trick people try is choosing the “world” region during setup (like World English). It limits bloatware, but again—it broke my clock. Some apps wouldn’t launch, and I had to manually reset the region to timezone. Doing that brought the bloat back, so choose carefully.
If you want to try these tweaks, go ahead—but expect some bugs. You can usually fix things by resetting your time zone.